Lamas Pyjamas
a design for a very small backyard behind a shop
Introduction
What is Lamas Pyjamas?
A fantastic charity shop with difference on the Roman Road, East London. For more info see their website:
http://www.lamaspyjamas.com/about-us
A fantastic charity shop with difference on the Roman Road, East London. For more info see their website:
http://www.lamaspyjamas.com/about-us
What are the origins of this design?
- me looking for more involvement with the LBC sangha (the community of people who attend the London Buddhist Centre and practise there), then going there as a volunteer 2011
- being there when the 'shed' was built in the backyard (their brand new office and meeting space)
- wanting to offer my services to green up the space around the shed using Permaculture tools and design
- the team being very supportive of the idea and indulging me as a practising designer
Contents
1. Design aims
2. Write-up using SARDIMet (Survey, Assess, Research, Design, Implement, Maintain, Evaluate, Tweak)
1. Design Aims
- create an outdoor sitting area for staff to relax in
- grow edible and useful plants
- provide wildlife habitat on very small scale
- spend time with Lamas staff on regular basis
- practise designing in a small urban spaces
2. Survey
|
Initial client interview
Chatted with SV one of the team at the time (Dec '11) about requirements of garden.
|
Physical Survey
Started surveying on 14th December 2011: taking photos and making sketches (see below) and measuring area. Google earth confirmed my guess that the back of the shop wall was North-facing (so front of shed South-facing ). |
Survey photos

The whole site from the roof.
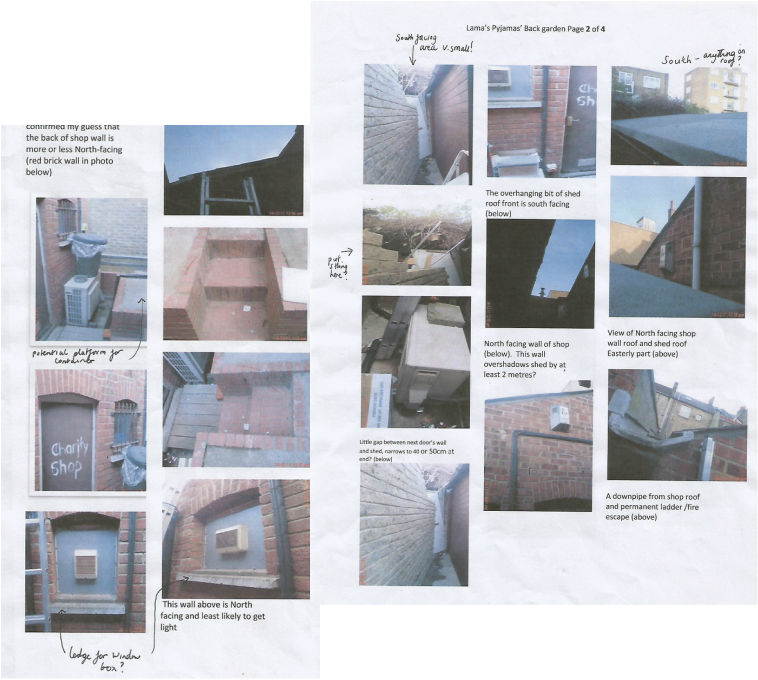 Various photos from all angles
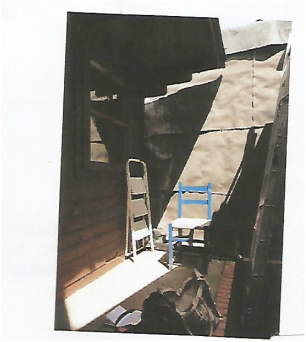
Photo showing afternoon sun cast on East wall.
The above photos are taken from as many angles and directions as I could, even the roof of the shop. This gave me an idea of the growing space available and of the limitations.
Survey sketches
I took an hour or so to sketch what was in the garden in December 2011. The sketches can encapsulate what the camera could not. (ie, the space I wanted to include in the picture). Press pause to take a closer look.
Assessment
Limits
1. Very little horizontal growing space especially if seating is wanted. About 1m2 on each side of steps that access the shed/office. Though lots of vertical space! (upto 3 m in some places).
2. The space is already very cluttered with bits of pipe, a ladder, water butt, leaves and bins. Some of this will need to be cleared.
3. Sunlight: a very narrow space for sun to shine through, plants will need to be placed high up or very shade tolerant.
4. As stated before, some spaces cannot be covered with plants or structures as they are functional or vulnerable to damage. Some elements need to stay and be worked around carefully, such as air conditioning units, cables for electricity supply and phone, air vents in shop wall and shed.
5. Ladder must stay on North-facing shop wall as it is unofficial fire escape.
6. Thatch of Russian vine at very back threatens to overtake the roof. See Sketch 5 above.
Opportunities
7. Water: there are two downpipes coming off shed and one on shop back wall - easy to fit a small water butt.
8. Air circulation and temperature: The shed roof and East wall are covered in dark materail (tarp?) so may retain heat in summer. However as the area is heavily sheltered and shaded it should be quite cool in summer and not draughty in winter.
9. Shop may have some items that they cannot sell that can be used for containers and crocks as well as structures for placing plants on, so may not get the size/type of container I planned for..
Research
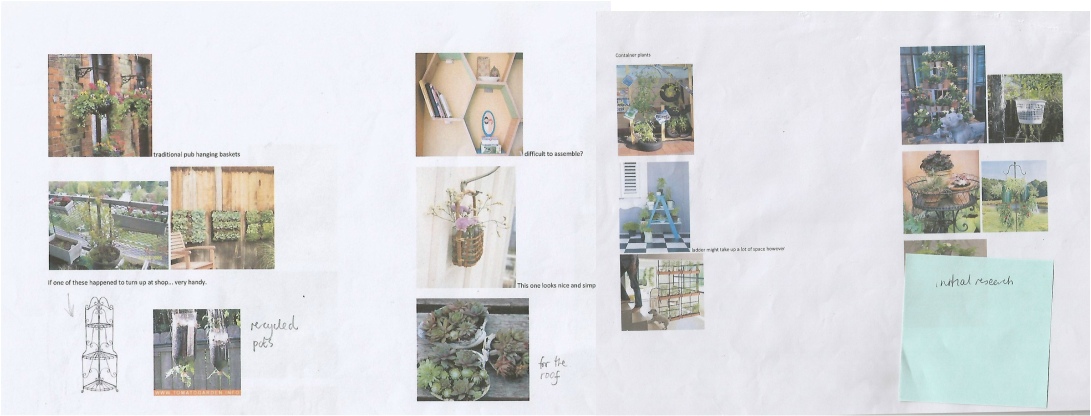
Ideas from magazines for containers and small spaces
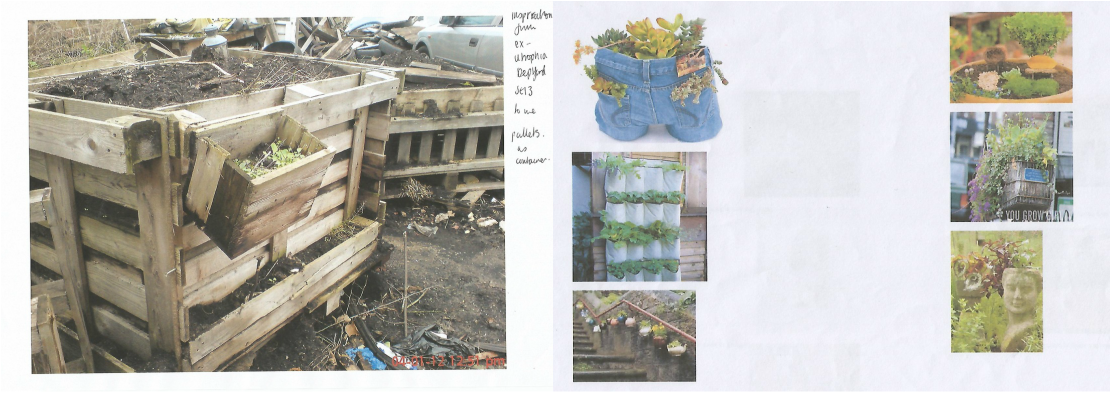
I found some container ideas on the internet and found some examples locally (see pallet container above). My favourite ideas involved re-using pallets and leaning plant shelves as well as using recycled materials. (Although initial client interview specified it was to look 'tidy'). I asked the team to start collecting things that could be used for this that they didn't want to sell. (See Implement below).
I also did some research in to shade tolerant plants and climbers and came up with following suggestions:
Penstemon (attractive/perennial) Chives (edible) Chocolate vine (edible if 2) Alpine strawberries (edible/trailing)
Diascia (annual) Coriander (edible) American Bittersweet Rocket (edible)
Coleus (red leaves) Hops (climbing/edible) Bugle (edible) Dog Violets (edible)
Fuschia (edible) Honeysuckle (climbing/edible) Creeping Jenny (trailing habit) Chard (edible)
Design

Above design: inset shows basic site boundaries and sun. Main pic suggests planters to go on patio area with seating and table. this is the largest availavle horizontal space and most practical for seating and large containers.
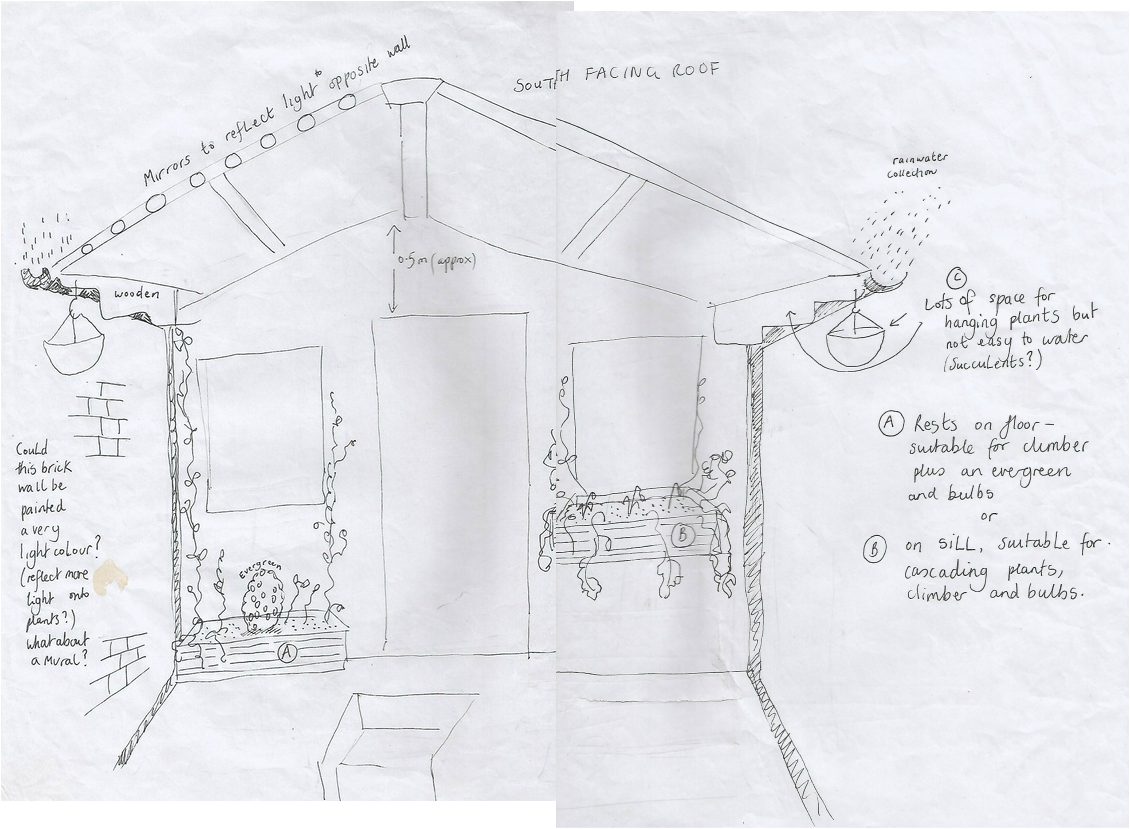
A alternative version of how the shed front could look.
This design suggests the containers go underwindow sill or on window sill to save a bit of space (though less light). I 've placed hanging baskets either side of shed for ease of watering and ease of installation (hooks inserted into wood). They also get the most sun there as they are high up and South facing.
A slightly different version to choose from
In this version the main containers are placed elsewhere, and it makes more use of Stacking (different heights of plants to use the abundant vertical space as well as horizontal). One structure is a leaning plant shelf made from discarded pallets and other is a container that straddles the down pipe and disguises it with something prettier. This trough would hold shade-tolerant climbers such as nasturtium, honeysuckle or chocolate vine.
This above version has two added terracotta pots for symmetry as well as the hanging baskets, because the budget allowed for some bought containers. I used a combination of Mc Harg's exclusion method and 2nd client interview to establish which elements would be implemented. (See Implementation below)
This above version has two added terracotta pots for symmetry as well as the hanging baskets, because the budget allowed for some bought containers. I used a combination of Mc Harg's exclusion method and 2nd client interview to establish which elements would be implemented. (See Implementation below)
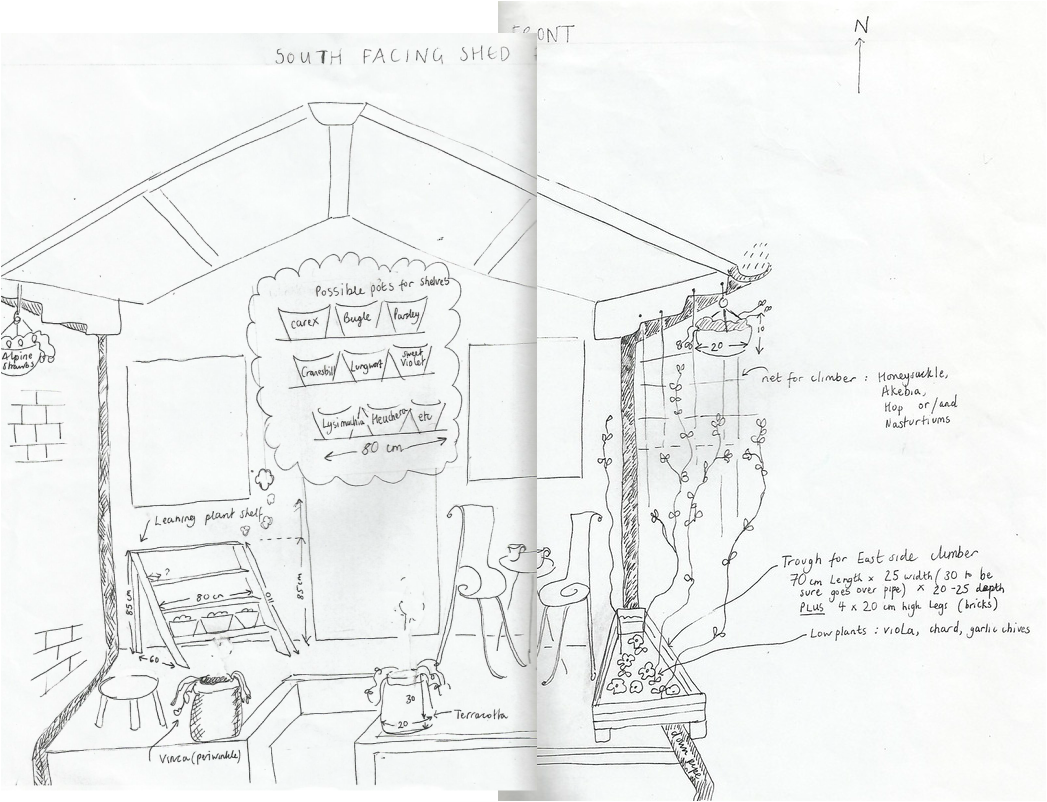
Ideas for the East facing wall (again involving leaning plant shelf!)
This is how I envisaged the leaning plant shelf would look, either against the shed in design above or leaning against the west wall. Again, these plants would need to be very shade-tolerant but would enhance a bare space considerably.
2nd client interview (with C and PL) and Budget March 2012
After showing the designs to 2 other members of team in March (SV had left so couldn't follow it up with her), the brief had changed slightly.
Changes to brief:
It was now Ok to use recyled materials. which would reduce the cost and free up money to spend on plants rather than containers.
After showing the designs to 2 other members of team in March (SV had left so couldn't follow it up with her), the brief had changed slightly.
- They liked all the designs but didn't want a water butt ( I think they sold it in shop anyway).
- It was decided not to paint the walls as they would be too high maintenance once they start to look faded
- The North-facing shop wall would have nothing on it due to air con units and ladder, but wind chimes and mosaics would be good (not discussed who would do that!)
- On the patio area, keep the larger side for seating, maximum 3 seats with a table, possibly folding. There's still room for a trough for climbers there. (Measuring up to 1m high, with 20cm legs to accommodate pipe running underneath, x width up to 75cm x length up to 70cm)
- The East wall covered with tarp has guttering, this needs to stay un-blocked. I suggested annuals as more manageable than perennials as they'd die back. Or self-seeders.
- 2 terracotta pots on 2 corners of entrance to shed defintely. As pracitising Buddhists, team likely to be mindful and not knock them off! C liked bay trees, PL something colourful. (Size: 30cm diameter and upto 60cm height).
- West wall has room for something too. (Upto 30cm width, x 60cm length with a possible height of 80cm).
- They like idea of plant shelf, made from pallet. But need to check if neighbours mind if wall drilled into
- Both like mirrors on shed and hanging baskets.
- Team to start looking for crocks, shrunken jumpers and containers.
- I suggested a preservative for wooden containers and structures as would degrade easily.
- PL and C asked me if some plants could be grown on the roof ? I said yes in theory though I have no experience of green roofs and was nervous about mucking up their brand new shed!
- They asked me to provide a costings sheet (see below).
- Asked if cables could be shielded from water drips (I said yes).
Changes to brief:
It was now Ok to use recyled materials. which would reduce the cost and free up money to spend on plants rather than containers.
Budget
The budget would be £200 for everything - plants, containers, tools and soil. PL would come with me to local plant nursery (Growing Concerns) and buy the larger plants and get a taxi back with soil.
The budget would be £200 for everything - plants, containers, tools and soil. PL would come with me to local plant nursery (Growing Concerns) and buy the larger plants and get a taxi back with soil.
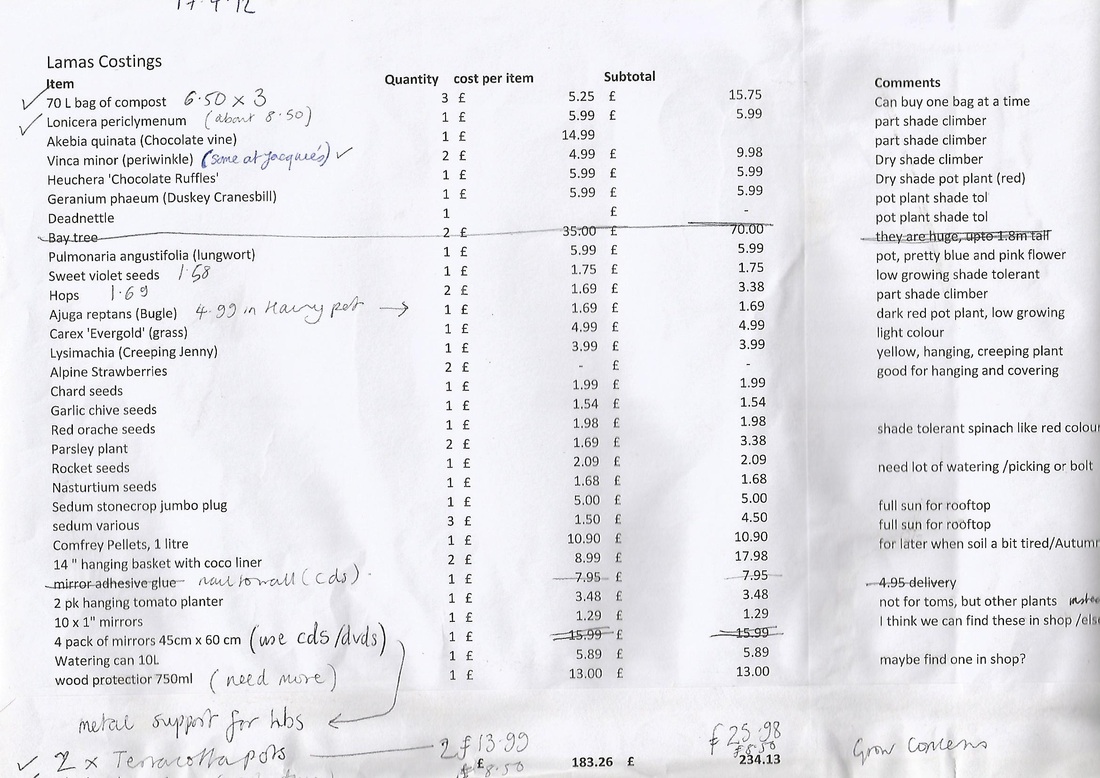
In April 2012 came up with the above costings to show to team (total £234). Some of the items were replaced with found items so the total was reduced by £50. Some of the plants couln't be found locally so were replaced with what they had in stock that was suitable, or plants I brought in that I had propagated.
I used prices from Organic catalogue or my local garden centre as guides.
From April to December 2013 I spent the last £50 on
I used prices from Organic catalogue or my local garden centre as guides.
From April to December 2013 I spent the last £50 on
- Large watering can £5.99
- Chicken manure pellets £9.99 plus £4.95 P and P and
- assorted seeds and plants (Wild rocket, nasturtium, patio plants) £28
Implementation
Mc Harg's Exclusion
What was excluded and why
What was excluded and why
- the trough on East side became two large plastic containers perched on bricks, we couldn't find anything like the size we envisaged and planting season was upon us so I made do with what the team had found through shop donations etc.
- The water butt - as I mentioned in 2nd client interview, they didn't want that.
- the plant shelf... I did make a leaning shelf (see implementation photos West side and leaning plant shelf below) but wasn't happy with the way pots that sat on it tipped up instead of laying flat. However, a lovely wooden ladder was found and brought in so I used that for the vertical plants plus galvanised wire to secure pots in place
- mirrors - PL suggested we use old cds that could n't be sold, I nailed them to wall symmetrically and they looked good (see photos)
- chocolate vine - they didn't have any in garden centre so we replaced with climbing nasturtium and honeysuckle
- hanging plant shelf - this was suggested for West wall. I wasn't completely confident drilling into wall of shop next door so put this off (is still a possibilty but probably not a priority)
- the size of the containers I wanted was not always possible. The shop had many small pots and tea pot-type objects for use but many turned out to be too small to support a plant beyond a few weeks. I was able to use a lot of unsold, damaged, shop donations for crocks however.
- watering can - I donated a spare one my mum had bought plus the shop had been given little jugs that would do for light watering.
- planting area in South west corner - I found a load of bricks at the end of the 'garden' that were part of the wall. I built a little wall around a plastic container and planted in there. (see Implementation photos West side below).
- a huge bay tree in a pot was donated by a friend at the LBC. This suddenly transformed the area into a green space.
Implementation schedule
Schedule
I was visiting the shop weekly in 2012 then monthly in 2013. I drew up a monthly schedule of tasks at home and arranged them on a sheet (photo below ) at home, but with post-it notes for flexibility. The schedule shown is for May 2012, in the early days of implementation.
I also used a small ring binder that I could carry around and recorded monthly observations, tasks and evaluations - see slideshow below the photo of post note schedule below.
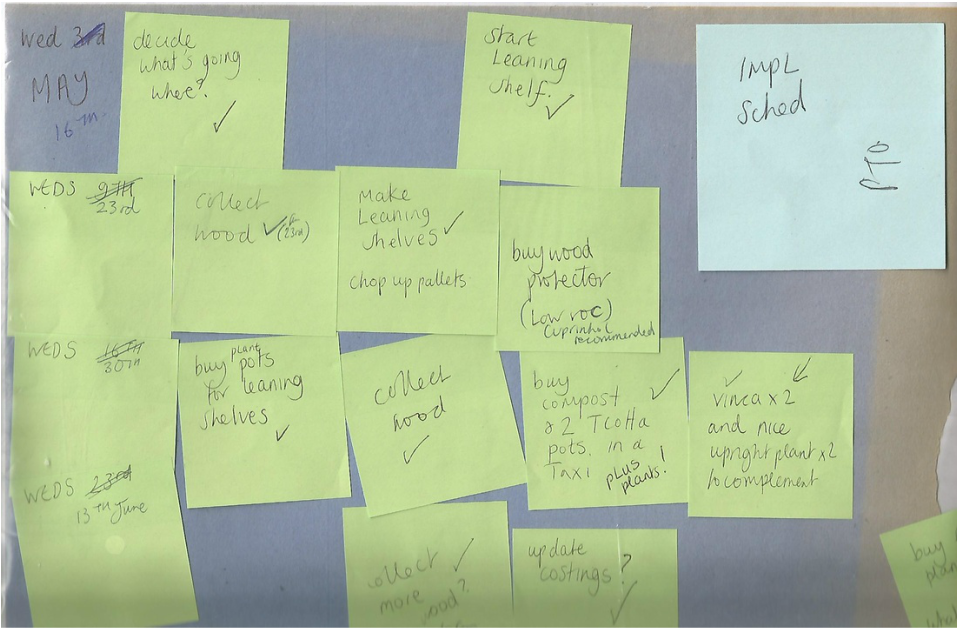
I carried out most of the implementation myself in weekly or monthly 2 hours slots. There were a few plant donations from the Sangha too - tulips bulbs and a huge Bay tree in a pot. Photos below show implementation stages.
Implementation photos - East side
Implementation photos - west side
Implementation photos
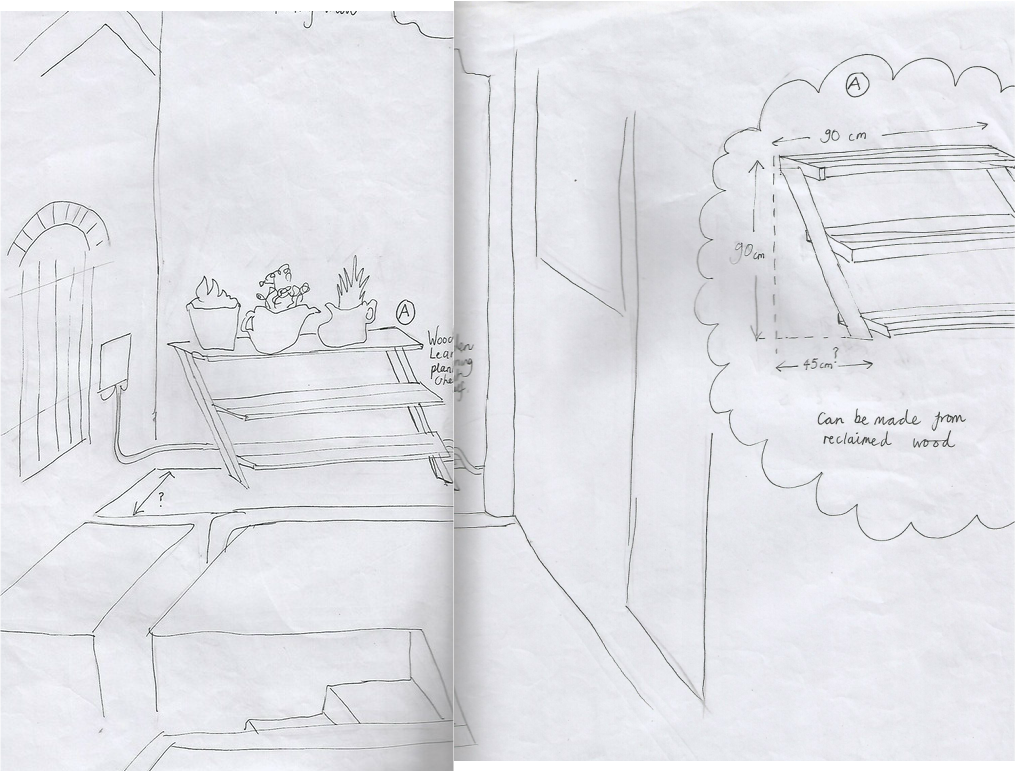
Leaning plant shelf


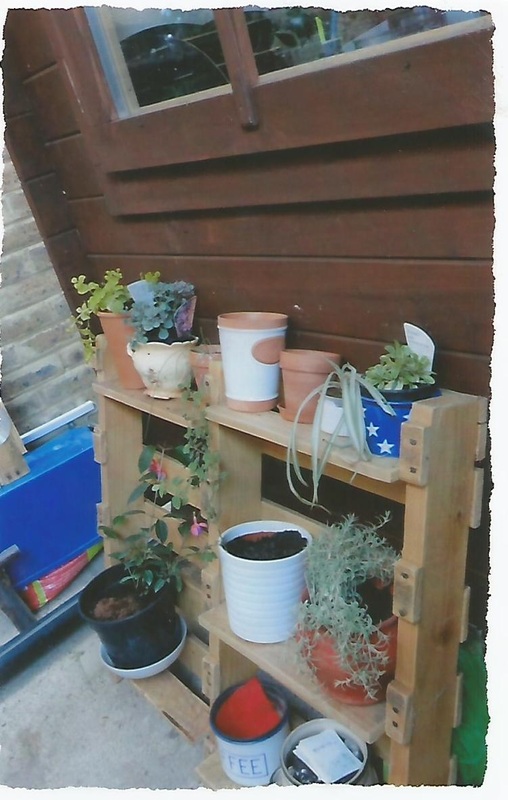
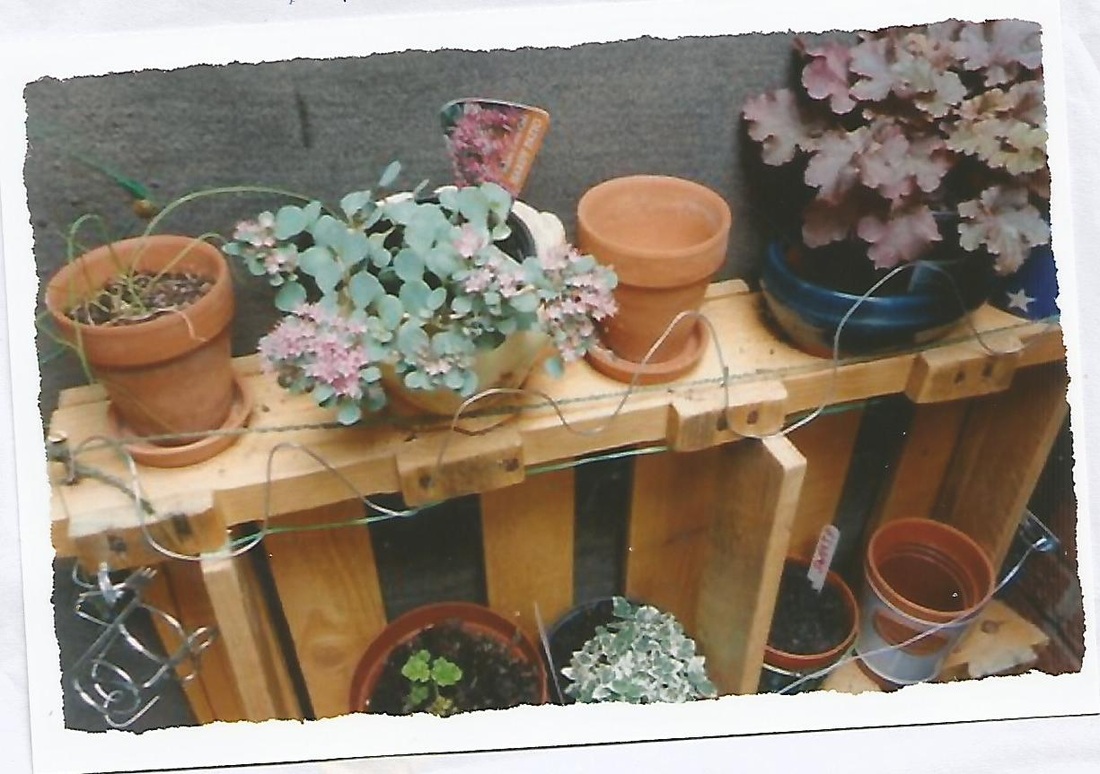
The story of the plant shelf
PL found a pallet and kindly dragged it all the way to the shop which I sawed bits from to create the result above. I didn't really know how to create the angles correctly but a friend told me I could saw off 30 degree angle. (Then use 60 degrees for complementary shelf angle). I used brackets to attach the horizontal pieces of wood to the sloping sides at 60 degrees. However I didn't measure using tools (I asked around but no one had anything for that). After a while I decided I thought it looked a bit too home-made as plant pots not perpendicular to floor, they were tipping upwards slightly! So I cut off the legs at 90 degrees and moved it to the East side and perched it upright on a wall, strapped in by galvanised wire.
PL found a pallet and kindly dragged it all the way to the shop which I sawed bits from to create the result above. I didn't really know how to create the angles correctly but a friend told me I could saw off 30 degree angle. (Then use 60 degrees for complementary shelf angle). I used brackets to attach the horizontal pieces of wood to the sloping sides at 60 degrees. However I didn't measure using tools (I asked around but no one had anything for that). After a while I decided I thought it looked a bit too home-made as plant pots not perpendicular to floor, they were tipping upwards slightly! So I cut off the legs at 90 degrees and moved it to the East side and perched it upright on a wall, strapped in by galvanised wire.
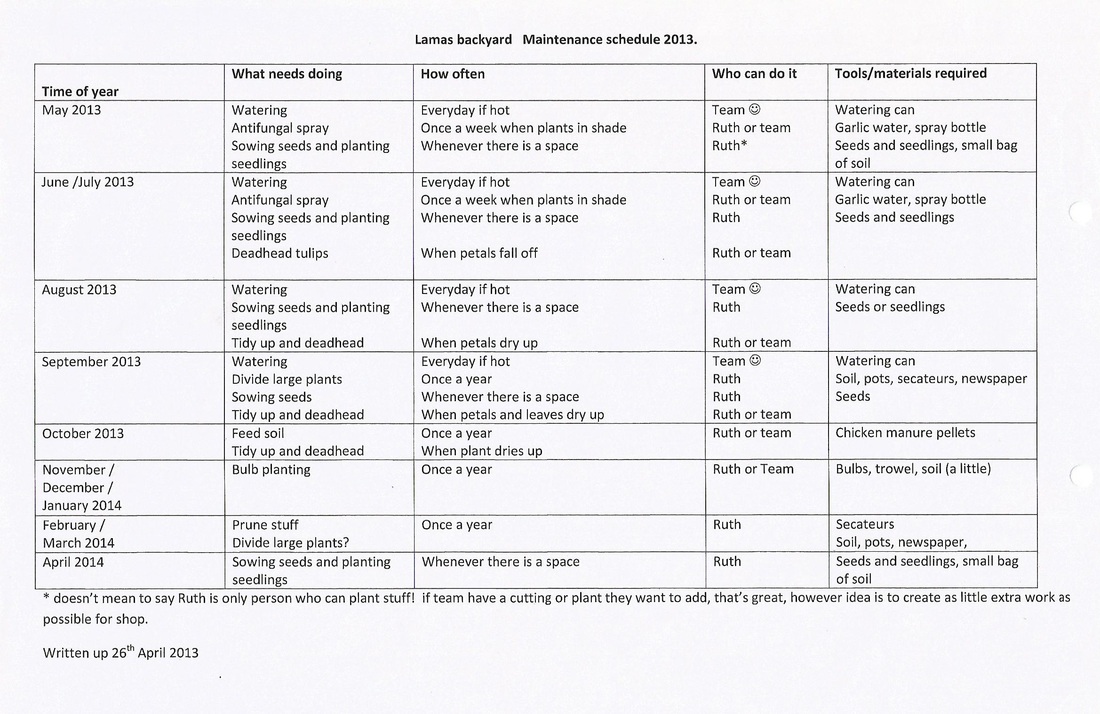
Maintenance
Based on observations throught 2012 I drew up this maintenance schedule for the following year and gave it to the team. I tried to minimise the work they needed to do as far as possible.
Evaluation
Overall
Does the backyard look better than it was?
Yes it was previously full of rubbish and 'dead' thiings. It's now a tidyish space with some greenery, seating though also used for storage and airing of shop goods too.
Have the aims of design been achieved?
Does the backyard look better than it was?
Yes it was previously full of rubbish and 'dead' thiings. It's now a tidyish space with some greenery, seating though also used for storage and airing of shop goods too.
Have the aims of design been achieved?
- Yes with a lot of help from the team together we created an outdoor sitting area for them to relax in and have lunch. (Yield)
- some of the plants were edible (herbs mainly). (Obtain a yield)
- It does provide wildlife habitat on very small scale, even if they are slugs and squirrels! Birds and bees may follow if enough reliable forage.
- I did spend time with Lamas staff on regular basis which was great as they are such a friendly bunch practising mindfulness and compassion in a busy, sometimes challenging environment.
- I also got to practise designing in a small urban spaces, which has its challenges and limitations!
|
My evaluation Using PMI
Plus
Minus
Interesting
|
Client evaluation using PMI
Plus
Minus
Interesting
|
Reflection
Processes
I used SARDIMET, which is just SADIM with Research section thrown in. I started this design in 2012 and at the time, hadn't really thought about using alternatives such as Looby's web or my own frameworks. I knew SADIM worked for me, although I feel there is often a research stage too before designing, so I was happy to use this slight adaptation.
Tools, methods
Survey: I conducted a thorough survey of physical space. Made easier by the fact it was fairly small (though high). I took photos and drew sketches so as to become familiar with size. Actual precise measuring was confined to surfaces that I knew I would use, such as patio area and height from ground to shelf for example. From the survey I learnt that there was a number of boundaries, see Mc Harg's exclusion below. (When are boundaries edges?)
I didn't use Triangulation, which would have ensured the measurements were precise (I used this when base-mapping St Saviour's Edible garden however).
Client interveiw: I carried out two of these as the original member of the team I spoke to then left. The second interview was after drawing up some design suggestions and was very positive.
Mc Hargs exclusion: I 've not used it before but it's good to use if there are lots of boundaries that might impede a design being implemented and is a pragmatic tool. It 's possible to design from patterns to details with this tool. It helped me decide what was practical to implement and what wasn't. (For example, mirrors not available, but abundance of old cds and dvds used to reflect light).
Costings: this was helpful for the clients to know what they were getting into. As it turned out I spent slightly less than the allowed budget of £200 plus additional £50 later on as alot of material was found and/or donated.
PMI for client interview - this helped client to come up with some feedback that was both positive and negative, as both were welcomed.
Progress as a designer
(See also My evalution using PMI above). I 've enjoyed designing for other people, in their workplace (see Ethics - peoplecare below). The space was challenging - very small, very vertical, very urban and very shady! The clients did not want any work to do resulting from the garden as they were already stretched. I feel confident I've responded to their wants/needs (see Client interviews and Client evaluation using PMI above). I'm a pleased with the designs I drew up, and the thorough surveying. Although I did notice that I started designing whilst surveying, a bit too tempting to put the ideas on the survey sketches (see Sketch 5, leaning plant shelf snuck in).
In November 2013 (2 years later) I noted in my Journal that I may was a bit unrealistic about my abilities to implement the design I drew on paper - especially the plant shelf! I was nervous about drilling into wall or shed in case I damaged a structure (note to self, improve confidence in DIY) and also decided rather rashly I didn't like the look of the leaning plant shelf and adapted it to an upright version which didn't use space to full advantage.
See Tweak below for more .
I really enjoyed the challenge of this design in a small space involving at least 3 other people in their work environment, (Accreditation criteria 2: Site development ) of area that would otherwise be full of junk or lifeless concrete and brick) though I must say they were particularly easy going and supportive, which has been a great help. I would certainly attempt this kind of design again as I think it is worth introducing plant life into any urban space.
I'm more confident now at designing for others and in smaller spaces and am more aware of problems likely to encounter.
Theory and practice
Principles used in this design.
Use and value renewable resources - well almost! Some of the containers were plastic and will need to be replaced eventually. I used a varnish for the wooden items to make it last longer and could n't find a very eco friendly one in garden centre. (Well, the centre said it was the most eco-friendly one they knew of).
Least effort: maximum effect - this principle came to light when the bay tree was donated. It immediately changed the look of the whole space, for the better.
Throughout this design I was Creatively using and responding to change - making do with what was available, seeing what worked and what didn't, responding to slight change in design aims after one of team left and new members joined.
Maximise the edge and value the marginal - London is full of edge. Lots of wiggly spaces around our buildings and gaps between that can be planted up and used to their full advantage. If all these smaller sites were developed the city would be more vibrant, productive, cooler and with cleaner air!
Produce no waste - the shop in general is very low impact and even tackles the problem of overproduction of goods by diverting clothes and goods from landfill and generating an income for the London Buddhist centre, which in turn, then offers the local community classes on a dana basis (give what you can).
Ethics
The main ethic of this design has been Peoplecare - providing an outdoor space between two indoor environments where team work where they can relax on a busy day for 15 mins without having to go and find a park (about a 10 to 15 minute walk away). I also tried to consider the team by making maintenance as light as possible, just watering mainly.
There has been some Earthcare of course as it has added a little greenery to a very urban street, which eventually may increase bee and butterfly numbers. Materials chosen have been as low impact as possible, and landfill has been reduced by reusing items.
Fairshares is expressed by the shop in general. The donations people give are their surplus and the shop's surplus income goes towards running the buddhist centre round the corner, which as I 've mentioned, offers classes people can afford, free if necessary.
Tweak
What would I do differently?
1. Given the unpredictable but pleasantly surprising resources that became available through the shop donations and friends, I would have designed more fluidly and less precisely. I would have loosely identified elements such as 'vertical growing structure' 'hanging growing structure' 'containers' and left the details out so as not to create high expectations in the clients' minds! Then the design would have been flexible enough to implement as the materials became available. (Which is what happened - it just departed from the design on paper considerably, not sure if that is plus, minus or just interesting. It would have been fun to intentionally and explicitly use Random Asssembly for this design.
2. In retrospect, would have used a reliable shade-tolerant climber such as Hydrangea petiolaris which although inedible would clothe the walls prettily and provide bee forage and bug habitat.
3. I would have specified that the size of pots be larger. Many of the containers found were pretty but too small to support a plant for long without drying out. And also vetoed plastic pots, though not sure how realistic that would have been.
4. I would have read 'Permaculture in Pots' by Juliet Kemp first!
5. Some of the plants aimed to be edible - ie, nasturtiums, chives, viola plus what was liked by the clients, however this design could have been a simple Tea Garden instead. Lemon Balm, Sage, Fennel (planted high up to catch sun) and Mint. Not sure what climbing plants are used for tea however.
Accreditation criteria met:
2. You have actively applied permaculture over a period of at least two years since your permaculture design course (PDC). (Research institute category: Site Development - introducing plants to a barren space, see Progress as a designer in Evaluation above)
3. Demonstrating design skills. SARDIMET; Surveying, Mc Hargs, Client inteview, Costings
5. Developing permaculture practice (Designing for 3rd parties, Reflecting and evaluating)
